In the first article of this 3 part series, we will be looking at how you can integrate your application with Revulytics Usage Intelligence in 4 easy steps from registering your product to viewing the first call-home data in your Dashboard. We will be using a simple calculator application and the .NET SDK with C# code examples to demonstrate these steps (we also offer SDKs and API documentation for C/C++, Objective-C, and Java).
- SDK Integration – Getting Started with Usage Intelligence – Part 1
- Event Tracking – Getting Started with Usage Intelligence – Part 2
- Software License Usage Tracking – Getting Started with Usage Intelligence – Part 3
Pre-Requisite:
- A Revulytics Usage Intelligence account. If you don’t have one yet you may sign up for free here
Registering Your Product
The first step is to register your product and retrieve the Callhome URL and Product ID. These will be unique to your product, and will be used to later integrate the SDK into your application.
- Log in to your Revulytics account
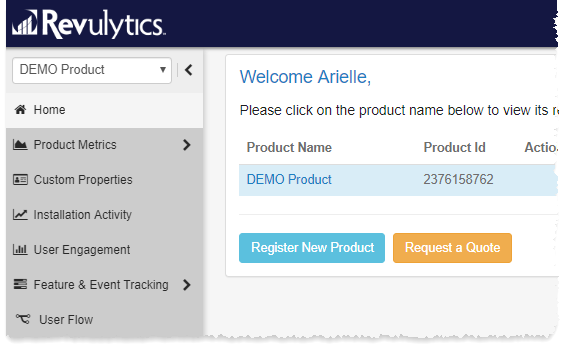
- On the Usage Intelligence Home page, click on the Register New Product button
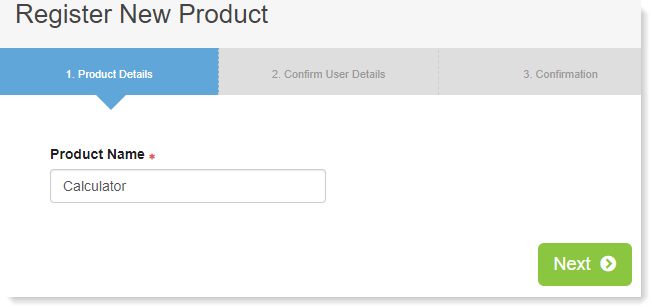
- Enter the name of your product, continue through the wizard providing the required information, and then click Submit.
- From the homepage, click on the gear icon next to your product name to retrieve your Callhome URL, Product ID, and AES Key. We will need these to integrate our application with Revulytics.

Downloading and Importing the SDK Files
The next step is to download the SDK files and import them into your solution to start making use of the available functionality provided by Revulytics.
- In the Developer Zone click to download the appropriate platform/language.
- Unzip the downloaded file and you should find 3 DLL files
- Copy the following files in the <Application Path>BinDebug folder of your application
- ruiSDK_<x.x.x>.x86.dll
- ruiSDK_<x.x.x>.x64.dll
- Open your application in Visual Studio, and in the Solution Explorer right click on References > Add Reference…

- Browse to the location where you unzipped the Revulytics SDK and choose ruiSDKDotNet_<x.x.x>. dll.
Integrating with Usage Intelligence
You are now ready to integrate your application with Revulytics. All you need to do is to tell Revulytics when to start and stop tracking to be able to see your first data.
- Open the class which contains the entry code for your application. In this example we will use the Load event of our calculator
- At the top of the file add the directive using RUISDK_<x_x_x>; where x_x_x is the SDK version you downloaded, e.g. 5_0_0
- Initialize the SDK by using the following code:
RUISDK rui; private void frmCalculator_Load(object sender, EventArgs e) { rui = new RUISDK(true, "path to Revulytics Usage Intelligence SDK .NET library"); string filePath = “<path where SDK files will be saved>”;  string productID = “<my product ID>”;
 string appName = “MyCalculator”; string productUrl = “<my product URL>”; int protocol = 1; string aesHexKey = “<my AES key>”; bool multiSessionEnabled = false; bool reachOutOnAutoSync = true; //Create config rui.CreateConfig(filePath, productID, appName, productUrl, protocol, aesKey, multiSessionEnabled, reachOutOnAutoSync); //Start app rui.StartSDK(); //The rest of your code… }
File Path – The path where the Usage Intelligence SDK config and log files will be saved
Product ID – The ID we retrieved when registering the product
App Name – A name for the app, cannot contain spaces
Product URL – The callhome URL we retrieved when registering the product
Protocol – The protocol to use to connect to the Revulytics server (1 = HTTP with AES encryption, 2 = HTTPS with fallback to HTTP + AES, 3 = HTTPS only)
AES Key – The AES Key we retrieved when registering the product
Multi-Session – True or False, whether session start and stop are managed by the application
ReachOut on Auto Sync – True or False, whether the SDK should check for automatic ReachOut campaigns when it performs auto sync - Add the following code where you would like the tracking session to stop. In this example we are using the FormClosing event of the calculator:
private void frmCalculator_FormClosing(object sender, FormClosingEventArgs e) { rui.StopSDK(0); } - Build your solution, and the next time you run the application Usage Intelligence will start logging data for you. You might need to run and close the application before you see the data in your Dashboard
Viewing Reports
Just by following these easy steps, Revulytics provides you with several reports on the usage of your application. To access these reports, go to your Usage Intelligence Homepage, select your product from the drop down at the top left, and select from the various options in the menu on the left. Below is a quick overview of the available reports at this stage.
Runtime Intelligence
- Activity Overview – View how many users used your application over a period of time
- Runtime Session Tracking – View the average running time of your application and the average number of sessions per user
Distribution Reports
- Geographical Distribution – View the location of your users by region, country and state
- Version / Build Distribution – Reports on the number of users per version or build
- OS Distribution – View the number of users per operating systems
Architecture Reports
- CPU & Memory – Reports on the CPU Cores, Types, and RAM where your application is running
- Operation System – View operating systems, architecture, and language
- Display – Reports on the screen resolution, number of displays and top resolutions in use
- PC Type – View the type of devices where your application is running, e.g. Desktop or Laptop
You are now ready to start tracking events in your application and report on custom data.