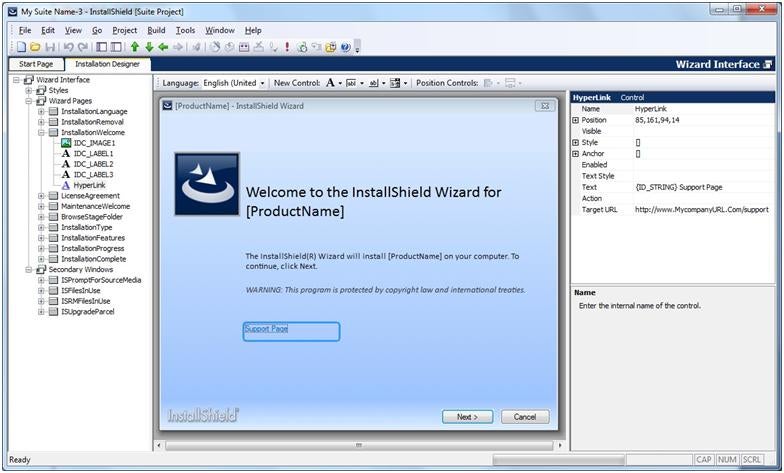
Have you ever wanted to add a web link to your setup? It is quick and easy to do with the Suite project hyperlink control.
Adding the Hyperlink Control
- Open up your Suite project.
- Browse to the Wizard Interface view.
- Select the wizard page you want to add a hyperlink to.
- Click on the hyperlink control on the toolbar:

- Size and position your new hyperlink control to the size and position you want.
- In the Text field, enter the text you would like to appear on the dialog. Ex: Support Page
- In the Target URL field, enter the URL that you want to navigate to when the hyperlink is clicked. Ex: http://www.MycompanyURL.Com/support
- Build and run your project.
You should see the hyperlink on your wizard page, and clicking it will navigate to the URL you specified.

Using a Property for Target URL
If you would like to use a property for your URL instead of hard coding the address, this is easy to do as well.
- Navigate to the Property Manager view.
- Click the “New” button.
- Specify a property name. Ex: SupportURL
- Specify a web address in the Value field. Ex: http://www.MycompanyURL.Com/support
- Navigate back to your wizard page in the Wizard Interface view.
- Change the Target URL to the property name you specified, enclosed in brackets. Ex: [SupportURL]
- Build and run the installation.
The hyperlink will now navigate to the web page specified in your property.
Using an Action with your Hyperlink
What if in addition to browsing to a URL, you also wanted to perform an additional action when a hyperlink is clicked? You can do this too. Let’s walk through opening a file.
- In the action field, enter: {Open ReleaseNotesFile}
- Browse to the Support Files view.
- Add the file you would like to open. Ex: ReleaseNotes.txt
- Browse to the Property Manager view.
- Click the “New” button.
- Specify a property name. Ex: ReleaseNotesFile
- Specify the file location for the property’s value. Ex: [SETUPSUPPORTDIR]ReleaseNotes.txt
- Build and run the installation.
The hyperlink will now navigate to the web page specified, and open ReleaseNotes.txt.
If you want to open only a file with the hyperlink control, you just specify the path directly in the Target URL field and do not specify anything for Action. Ex: [SETUPSUPPORTDIR]ReleaseNotes.txt
Or, if you wanted to open the file with a button instead of a hyperlink control, you could specify the same action you did for the hyperlink control in the button’s Action field. Ex: {Open ReleaseNotesFile}
For more how-to information, review the InstallShield Tips & Tricks.


