Windows Installer – Get Started with InstallShield
Windows Installer or MSI Installer is a Microsoft defined standard package for the installation, maintenance, and removal of software on modern Microsoft Windows systems. It provides a consistent experience for software developers/vendors to package their software for distribution and installation on Windows systems irrespective of which version it’s being installed on.
Windows Installer uses a database-like file called a Windows Installer Package (MSI) to describe the installation process, including what files and registry settings need to be created, modified, or deleted during installation and uninstallation. When you run an MSI file, Windows Installer takes care of installing the software, checking for prerequisites, and configuring the system as needed.
Windows Installer is built into Windows operating systems since Windows 2000 and has been the installation format of choice for many popular software applications.
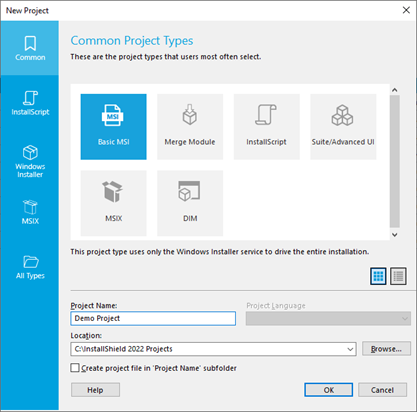
In this section, we will understand how to get started with creating a Windows Installer using InstallShield. InstallShield supports several project types, but as you can understand, the most popular one is to create a Windows Installer using the Basic MSI Project
Create a Windows Installer project – Basic MSI Project
Creating your first Windows Installer setup from InstallShield can be done in 3 simple steps
1. Create a Basic MSI Project
2. Add files in the ‘Files and Folders’ view
3. Build the project using the options available in the toolbar/ribbon

You can also refer to the short video that depicts this process
Once the build process is complete, you can launch your Windows Installer setup by navigating to the release folder or by simply running the ‘Run’ option in the toolbar/ribbon.
However, most software applications are not as simple as adding a file. In the following sections, let’s explore some of advanced capabilities that you’d like your installer to do.
Advanced Windows Installer Capabilities
Installation Information
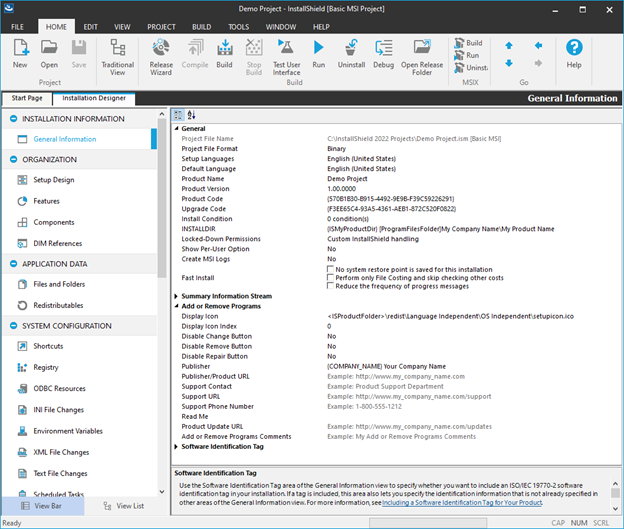
InstallShield stores your project settings in a single installation project file (.ism file). This file stores all of the information about your project. In the General Information view, you can edit basic information about your installation project—including the author’s name, the languages that the project supports, and any comments that you want to include. The General Information view is also where you configure general product information such as the product name, the product code (GUID), and the version number. In the same section, you can configure the application’s settings in Add/Remove Programs.
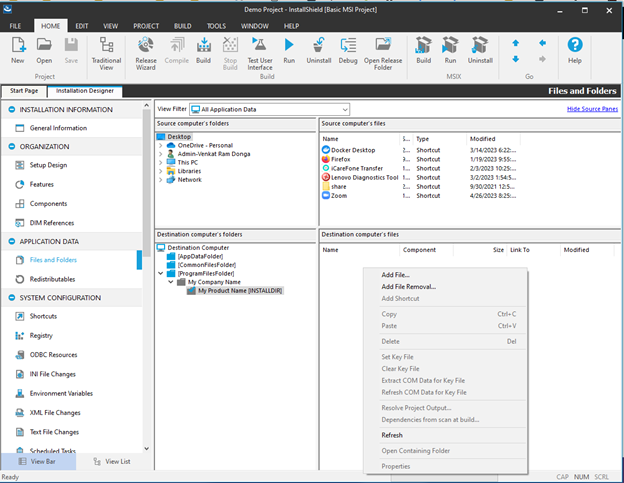
Adding Files and Folders to your Windows Installer
The main purpose of most installations is to transfer files from the source medium to the target destination. With InstallShield, adding files to your project is a simple drag-and-drop process in the Files and Folders view. This view contains a files explorer that enables you to drag and drop files from folders on your source machine to folders on the destination machine. The two left panes in the files explorer contain folders, and the two right panes display the files that are located within those folders. For more details, refer to the Files and Folders View in user guide.
Configure Prerequisites for your Windows Installer
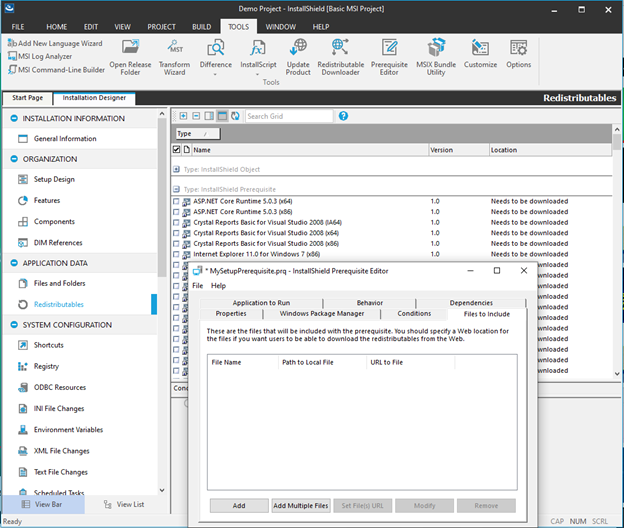
More often than not, you have several dependencies of your application and wouldn’t want your users go through the process of figuring them out. A most common example could be the need of a specific .NET framework or a Java Runtime for your application to run. InstallShield allows you to configure what’s called prerequisites to install before your application installs so that both install time and runtime dependencies are resolved when the actual app is run. You can leverage the out-of-the-box prerequisites that are included with InstallShield or use the InstallShield Prerequisite Editor to create/configure your own. For more details, refer to the Prerequisites View in user guide.
Create and Configure Shortcuts
Every installation changes the target system in some way. The simplest installations might only copy files. More in-depth installations make registry changes, edit .ini files, or create shortcuts. InstallShield provides the separate views for making advanced configurations. Shortcuts offer quick access to your installed application. You can create shortcuts and program folders on the desktop, the Start menu, and various other locations.
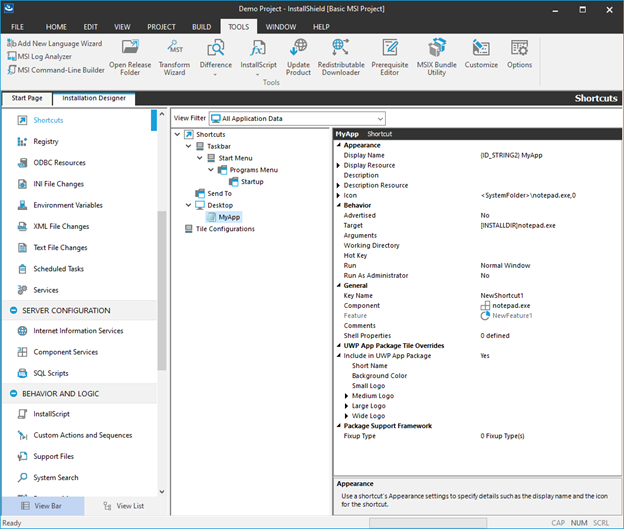
The Shortcuts View provides a simple, visual way to create shortcuts to your application on the target system. This view contains a Shortcuts explorer that shows a set of predefined destination folders under which you can create shortcuts and subfolders. You can configure various settings for your shortcut like which icon to be used for shortcut, where to place the shortcut during installation etc.
Adding multiple languages to your Windows Installer package
InstallShield supports many features that enable you to customize your installer for global distribution. Using these features, you can create a single installation project that displays end-user text in multiple languages and can handle conditional installation of language-specific files. Creating a multilingual installation primarily involves separating code from language-specific resources and files. You may also need to distribute separate files for your installation, such as graphics, license files, or custom actions, depending on the language in which the installation is running. Another consideration is whether you need to install different application files depending on the target system’s locale. For more details, refer to the Creating Multilingual Installations in the user guide.
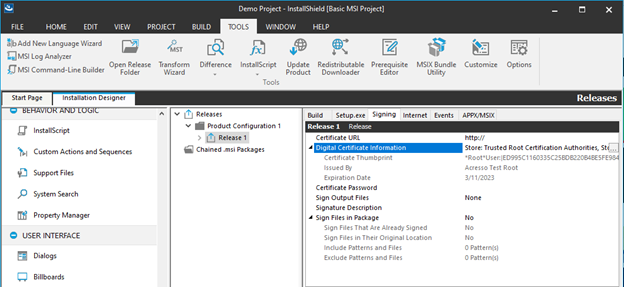
Digitally Sign your Windows Installer package
One of the last few steps that you’d like to do before distributing the package is to digitally sign your installer to avoid impersonation and allowing your users to trust your package. The Signing tab is where you specify the digital signature information—including the digital certificate files that a certification authority grated to you—that InstallShield should use to sign your files. It is also where you specify which files in your installation should be digitally signed at build time.
Integration with Visual Studio
If you are a developer who uses Visual Studio, InstallShield makes it increasingly convenient to create/edit/build windows installers right from within Visual Studio. The out of the box integration with Visual Studio allows developers to add project output to InstallShield projects without having to navigate away from Visual Studio. This integration simplifies the process of creating installation packages for Windows applications and streamlines the software development workflow. For more details, please refer to Integrating with Microsoft Visual Studio article.
Build MSIX Packages with InstallShield
MSIX is a introduced by Microsoft in 2018 as the next gen packaging format for distributing Windows applications. It is a successor to the earlier MSI (Microsoft Installer) format and provides several advantages over it. MSIX is designed to be secure, reliable, and flexible, with features that support both traditional and modern Windows applications. One of the key benefits of MSIX is that it provides a standardized and consistent way to package applications, making it easier to manage and deploy them across different Windows versions and devices. MSIX is the first installer format that can help with really clean uninstalls – leaving zero residue in the machine, once the package is removed. MSIX packages are self-contained and can include all necessary files, dependencies, and registry settings, reducing the risk of conflicts or errors during installation. MSIX also includes several security features, such as digital signing, file and registry virtualization, and runtime isolation, which help prevent unauthorized modifications or access to system resources by malicious or poorly designed applications.
InstallShield allows you to build MSIX packages in two ways
- If you already using InstallShield and building a windows installer using Basic MSI project, you can use the Appx/MSIX tab in releases view to build an MSIX package right away
- If you are starting from scratch, you can use the MSIX Project and get started
Here is a short video illustrating how you can create an MSIX package from scratch in simple steps:
Build your installers from within Azure DevOps pipelines
InstallShield can be integrated with Azure DevOps and you will be able to build your windows installers or any format directly in the pipelines. You can leverage either the hosted agents provisioned by Microsoft or configure your own private agent to build windows installers configured via InstallShield projects.
InstallShield uses a proprietary licensing model – Cloud License Server to simplify the process of building windows installers in hosted agents. Here is a short video on how to configure and build your installers in Azure DevOps pipelines
Frequently Asked Questions (FAQs)
Windows Installer (MSI) is a standardized format from Microsoft for installing, maintaining, and removing software applications consistently across Windows environments.
MSIX provides clean uninstallations without leftover files, enhances security with built-in digital signing and runtime isolation, and ensures compatibility across various Windows versions and devices.
Yes, InstallShield integrates directly with Visual Studio, enabling developers to manage installations without leaving their development environment.
Absolutely. InstallShield seamlessly integrates with Azure DevOps, allowing you to automate your installer builds efficiently using hosted or private agents.
Yes, InstallShield fully supports multilingual installations, allowing conditional installations based on user language preference or system locale.
Resources
Data Sheet
InstallShield 2026
Build Seamlessly in the Cloud with InstallShield Licensing Capabilities
Data Sheet
Compare InstallShield Versions
Compare features by the latest releases.
Webinar
Enabling Successful Software Installs with New Digital Signing Standards
Register for the upcoming webinar and be better equipped you with the knowledge and tools necessary to navigate changes to digital signing standards effectively for a seamless installation experience.
Data Sheet
Cloud License Server with InstallShield
Get your questions answered about how to eliminate the time and effort required to set up and manage local License Servers. Easily configure your builds from the DevOps build pipeline with InstallShield’s Cloud License Server.
Online Event
“Unpacking MSIX”: Panel Discussion
Watch this roundtable discussion to learn more about how developers can retain as much code as possible as they continue to innovate and modernize applications.
Webinar
TechTalk: InstallShield “Suite” Secrets
In this TechTalk you’ll learn about Suite, a project type within InstallShield, and how it resolves the problem of installing multiple packages, learn how Windows features in Suite works, and how secure it is to send packages via an installer.
From the Blog
Blog
What’s New in InstallShield 2026?
Blog
What’s Changed in Code Signing?
Blog
32-bit vs 64-bit Installers: A Supplier’s Guide
Want to learn more?
Whether you are an existing customer needing assistance, or new to Revenera's Software Installation solutions, we are happy to help out with your Installation needs.